Welcome to the official implementation guide for the Hector + Vauban VISOR integration.
⚙️ Functional Overview
The integration operates in two distinct layers: User Identity Sync and Access Provisioning.
🧠 How it Works
User Identity Sync (VISOR → Hector): Hector connects to your VISOR controller and retrieves the list of users. Each VISOR user is matched to a Hector user by email, creating a persistent link between the two identities so that access can be granted later on behalf of the correct person.
Loaner-Driven Access (Hector → VISOR): When a Hector loaner (a reservation for a Place equipped with a VISOR reader) is about to begin, Hector automatically creates a temporary VISOR access group that authorizes the linked user on the mapped readers. When the loaner ends, Hector deletes that group — revoking the physical access without manual intervention.
✅ Key Capabilities
The Hector-VISOR integration is a professional-grade bridge between your asset/reservation workflow and your physical access control system. If you are looking to turn a Hector reservation into a working door key automatically, these are the core features at your disposal:
- 🔑 Loaner-Triggered Access: The moment a Hector loaner enters the activation window, the borrower’s VISOR badge gains access to every reader tied to the loaned Places — no manual badge configuration needed.
- ⏱️ Buffered Activation & Revocation: Fine-tune when access turns on and off with two configurable buffers (minutes before the loan starts and minutes after it ends), so users never find a door locked one minute early or unlocked one minute too long.
- 👥 Automated User Matching: On every sync cycle, Hector pulls the VISOR user list and links each badge holder to their Hector profile by email address — no manual mapping required.
- 🚪 Flexible Reader Mapping: Pick and choose exactly which Hector Places should be tied to which VISOR readers. Unmapped Places are silently ignored, so you can roll the integration out progressively.
- 🧹 Self-Cleaning Access Lists: Every access group created by Hector is named with the prefix
"Hector-"and tracked internally. Expired groups are deleted automatically, keeping your VISOR access matrix clean and auditable.
🛡️ Configuration: VISOR Side
Before connecting Hector, a few prerequisites must be in place inside your Vauban VISOR environment. These steps are typically performed by a VISOR administrator (or in coordination with your VISOR integrator).
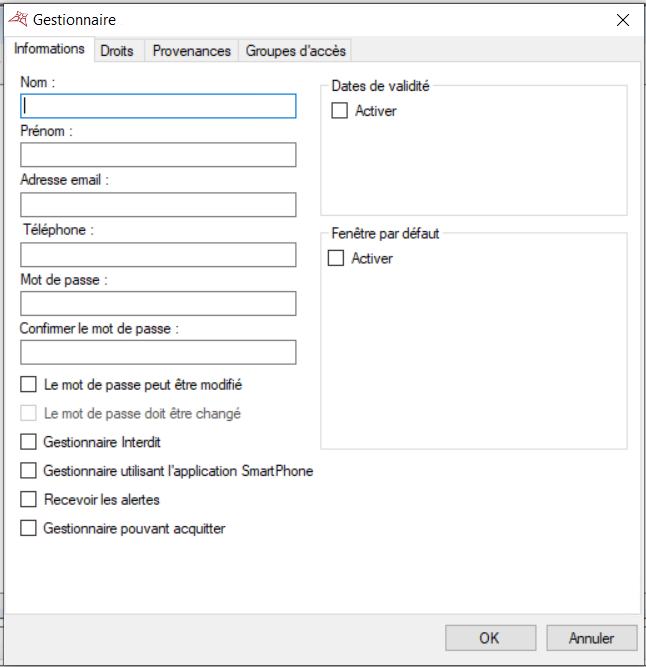
👤 Use or Create an Admin Account for the API
Hector authenticates against the VISOR API on every sync run. To make these calls succeed, you must provide it with a VISOR account that holds the right set of permissions. These permissions are configured in VISOR under the Rights tab of the user profile, and the integration requires the following minimum settings:
- User Listing — at least Read Only. Required to fetch the VISOR user list and match badge holders to Hector users.
- Users — Total Control. Required so Hector can assign newly-created access groups to the correct user slot.
- Access Groups — Total Control. Required to create access groups when a loaner starts and to delete them when it ends.
All other rights can be left at their default value. Granting more than the strict minimum is acceptable — for example, an existing administrator profile that already has full control across the board will work without modification — but granting less on any of these three rights will cause the integration to fail at runtime.
You have two options:
- Reuse an existing admin account. This is the fastest way to get up and running, but be aware that any password rotation on that account will break the integration until the new password is re-entered in Hector.
- Create a dedicated admin account for Hector. This is the recommended approach. A dedicated service account makes the integration easier to audit (every API call appears under that user in your VISOR logs), avoids accidental lockouts when a human admin is offboarded, and lets you rotate the password independently from your other administrators.
Whichever option you choose, take note of the username and password — you will paste them into Hector during the Authentication step.
🌍 VISOR Must Be Reachable From Hector
Hector is a hosted service that calls the VISOR API over the public internet from our hosting infrastructure. Before the integration can run, the VISOR API URL must be reachable from outside your corporate network. A VISOR controller that lives purely on an internal segment — accessible only on-premises — will not work in production. How you expose it (reverse proxy in the DMZ, firewall pinhole, dedicated public hostname, etc.) is up to your IT team; the integration only requires that the URL respond to HTTPS calls from our outbound IP.
🌐 Whitelist the Hector IP in External Connections
By default, the VISOR API rejects calls coming from unknown sources. You must explicitly authorize Hector’s outbound IP address before the integration can talk to your VISOR controller.
- Contact the Hector support team to obtain the IP address that your Hector instance uses to reach external systems. This address depends on your hosting region, so do not assume a generic value — always request it from support.
- In VISOR, open Tools > Preferences and locate the External connections section.
- Add the IP address provided by Hector support to the list of authorized external connections.
- For that newly added entry, make sure the authentication mode is set to “secured”. Any other setting (open / unsecured) will be refused at runtime by the integration and will prevent Hector from authenticating.
- Save your changes in VISOR.
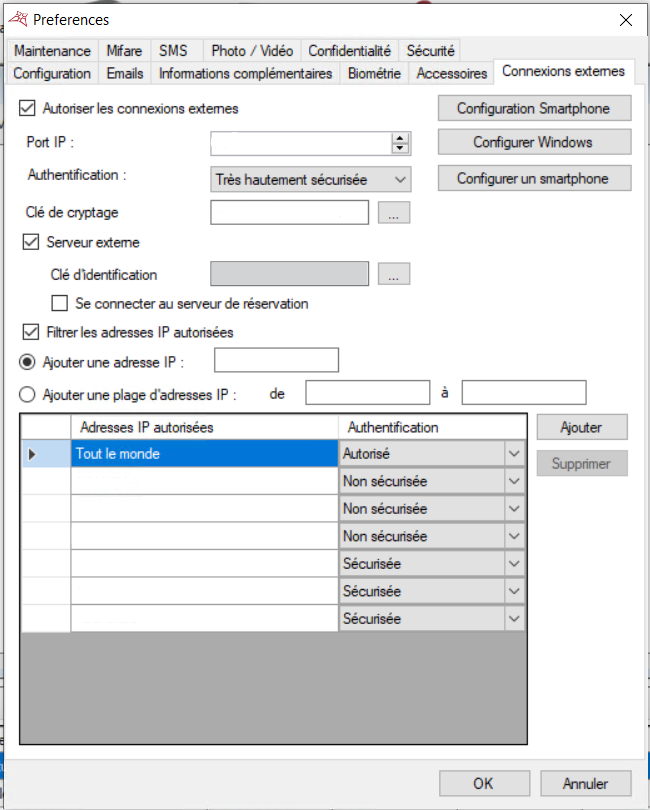
⚠️ Note : If you skip this step (or forget to flip the new entry to “secured”), the Validate button on the Hector side will fail with an authentication or connection error, even though the username and password are correct.
📋 Other Prerequisites
- VISOR API URL: The base URL of your VISOR API endpoint (e.g.,
https://visor.yourcompany.com). Hector uses this base URL to reach the integration endpoints automatically. - Email on each badge holder: Hector uses the Email field of each VISOR user to link them to the corresponding Hector user. Make sure every badge holder that should benefit from the integration has their corporate email populated on their VISOR profile.
- Reader inventory: The readers that will be exposed to Hector must already be created and named meaningfully in VISOR. They will appear in a dropdown during configuration on the Hector side.
- Free group slots: VISOR allows up to 10 access groups per user. Hector will consume one slot per active concurrent loaner. Plan your VISOR groups so that badge holders keep enough free slots for the volume of loaners they are expected to receive.
🛠️ Configuration: Hector
In Hector, go to Settings > Integrations > Loaners and open Vauban VISOR, then click Add. The Vauban VISOR integration is available on invitation; if you do not see it in your list, contact Hector support to have it enabled on your instance.
The configuration screen is split into two tabs: Authentication (shown first) and Inventory (unlocked after credentials are validated).
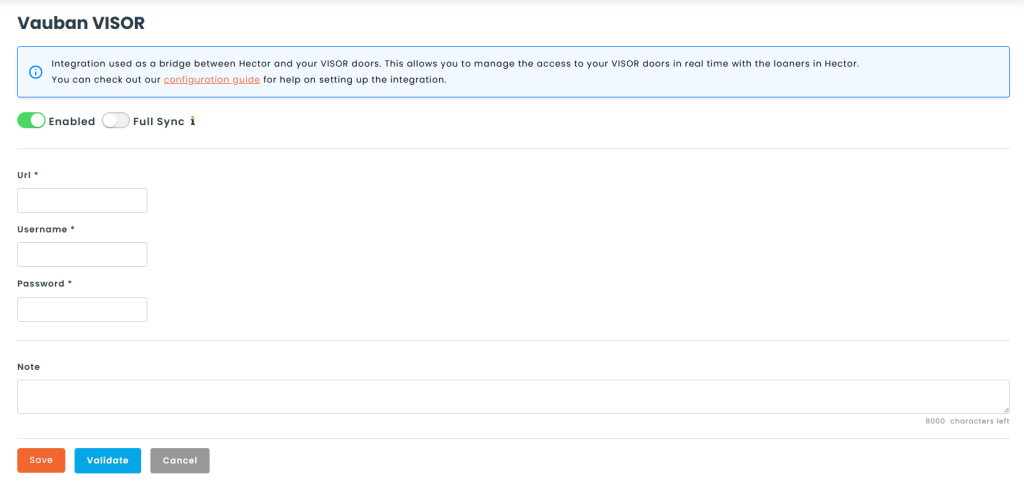
🔐 Authentication Tab
Fill in the three required fields:
- Url: The VISOR API base URL collected above.
- Username: The VISOR service account login.
- Password: The service account password. Hector encrypts this value before storing it; it is never written to the database in plain text.
Once saved, click Validate. Hector will open a test session against the VISOR API and immediately close it. If the credentials are correct, the integration is marked as Validated and the Inventory tab becomes available. If validation fails, an error banner will display the reason returned by the VISOR server (most often an HTTP 403 on bad credentials or a connection error on an unreachable URL).
⚠️ Re-validation : Any modification to the Authentication fields after the first validation resets the integration to an unvalidated state and hides the Inventory tab until you validate again. This protects you from synchronizing against a mistyped URL or revoked password.
🗂️ Inventory Tab
The Inventory tab contains two sub-sections: Readers and Access.
🚪 Readers — Mapping Hector Places to VISOR Readers
This is the heart of the integration: you decide which Hector Place controls which VISOR reader. Each row in the mapping table contains two dropdowns:
- Hector Places: The list of Places registered in your Hector instance.
- Visor Readers: The readers returned live by your VISOR API.
Click Add to create additional mapping rows, or the trash icon to remove one. A Hector Place can be linked to a single VISOR reader. A Place that is not mapped here will never trigger any door access — the loaner will still exist in Hector but will be silently ignored by the access sync.
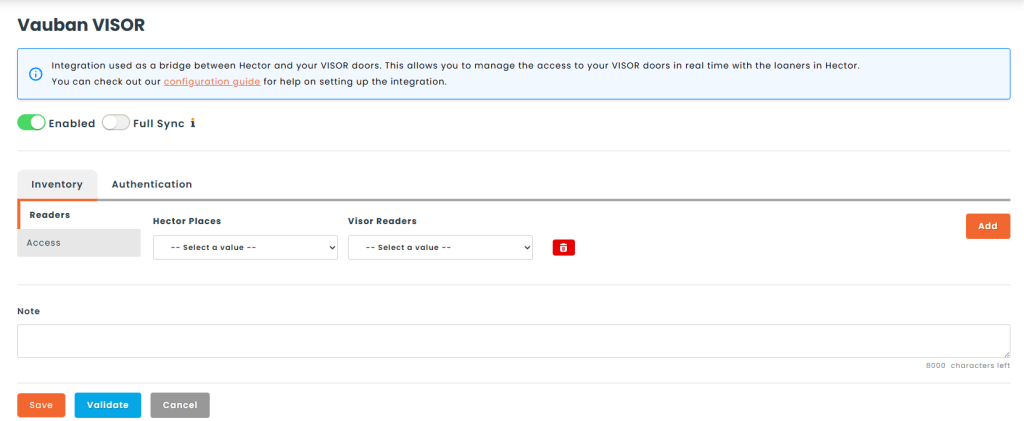
💡 Tip: If the VISOR readers dropdown is empty, it means Hector received an empty list from the VISOR API. Double-check that your service account has permission to read the reader inventory and that at least one reader exists on the VISOR side.
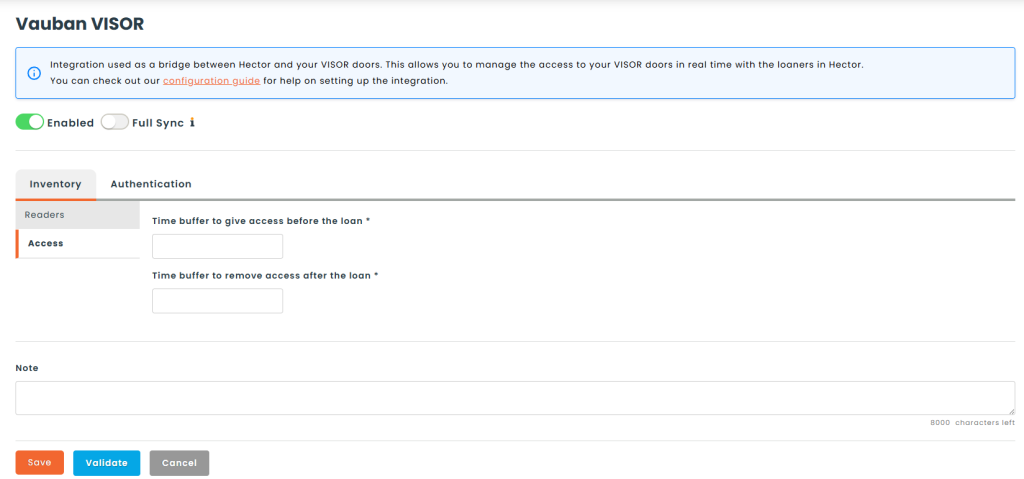
⏱️ Access — Activation Buffers
Two required numeric fields (expressed in minutes) control the timing of access provisioning:
- Time buffer to give access before the loan: How many minutes before a loaner’s begin date Hector should start granting access. For example, a buffer of
15means a 9:00 loaner becomes usable at 8:45. - Time buffer to remove access after the loan: How many minutes after a loaner’s finish date Hector should keep access active before deleting the VISOR group. A buffer of
10means a 10:00 loaner retains its badge access until 10:10.
Both buffers are applied at the moment the access sync runs, so they effectively define the activation window around each loaner. Enter 0 if you want access to begin and end at the exact loaner boundaries.
🔄 Usage & Synchronization
Once the integration is validated and the Readers are mapped, Hector runs two independent background jobs: the User Synchronization and the Access Synchronization.
📥 User Synchronization (VISOR → Hector)
This process links every VISOR badge holder to a Hector user profile. It is a prerequisite for the access synchronization — a loaner cannot generate a VISOR group if the borrower has not been matched first.
🕒 Sync Frequency
The User Sync runs once a day as part of Hector’s daily integration cycle. It can also be launched manually from the integration screen for instant recomputation (for example after importing a batch of new badges in VISOR).
🔁 Sync Behavior
- For each VISOR user, Hector searches for a Hector user whose Email matches the VISOR user’s Email (case-insensitive, exact match).
- On a match, an internal link is stored between the Hector user and the VISOR user. Subsequent syncs identify the user by this link, so the email can change on either side without breaking the mapping — only the very first match is email-driven.
- Users that previously existed in VISOR but have been deleted are automatically unlinked on the Hector side — the Hector user profile is preserved, only the VISOR link is removed.
🧱 User Field Mapping
| VISOR User Field | Hector User Field | Notes |
|---|---|---|
| Used to match a VISOR user to a Hector user on initial sync (case-insensitive exact match). |
⚠️ Identity pre-requisite : The Hector user must already exist before the sync runs. VISOR users are not created as new Hector users automatically — Hector treats VISOR as an access-control peripheral, not as an identity provider. Use the Hector user creation UI (or the Azure/Google user sync if you have one) to provision users first.
📤 Access Synchronization (Hector → VISOR)
This process turns Hector loaners into VISOR access groups. It is structured as a two-phase cycle: grant new access first, then revoke expired access.
🕒 Sync Frequency
The Access Sync runs approximately once every five minutes and reconciles the state of all open loaners with their VISOR equivalents.
🔁 Phase 1 — Grant
Hector then queries every loaner that satisfies all of the following conditions:
- Status is considered Open.
- The loaner’s finish date is in the future.
- The loaner’s begin date is within “now + Time buffer before”. In practice, this means the loaner is either already active or is about to start within the buffer window.
- The loaner has not been granted access yet (no tracking record exists on the Hector side).
For each eligible loaner, Hector performs the following steps:
- Resolve readers: Each loaner line pointing to a Place is looked up in the reader mapping. Unmapped Places are skipped with a warning. Duplicate readers are deduplicated.
- Resolve user: The Hector user who requested the loaner is matched to their linked VISOR user. If the user has not been linked by the User Sync, the grant is aborted with a warning.
- Find a free slot: VISOR allows up to 10 access groups per user. Hector picks the first empty slot. If all ten are occupied, the grant is aborted with a warning and will be retried on the next cycle.
- Create the group: Hector creates a new access group named
Hector-{LoanerCard}in VISOR, containing the list of authorized readers. - Assign the group: Hector writes the newly-created group into the free slot of the VISOR user.
- Track the grant: Hector persists a record linking the loaner to the VISOR access group, along with the computed expiry timestamp. This record is what Phase 2 will inspect on future runs.
🧱 Access Field Mapping
| Hector Loaner Field | VISOR Access Group Field | Notes |
|---|---|---|
| Card | Group Name | The VISOR group is named Hector-{LoanerCard}, which makes every Hector-generated group instantly identifiable inside the VISOR admin UI. |
| Items → Place | Authorized Readers | Every Place in the loaner is resolved to its mapped VISOR reader. Unmapped or duplicate readers are silently filtered out. |
| Requester | User Group Slot | The matched VISOR user receives the new group on their first free slot (up to 10 per user). |
🔁 Phase 2 — Revocation
- Hector enumerates every previously-granted loaner link and checks its stored expiry timestamp (which equals the loaner’s finish date plus the “after” buffer).
- Any link whose expiry has passed prompts Hector to delete the corresponding access group in VISOR, freeing the user’s group slot immediately. The tracking record in Hector is cleaned up at the same time.
⛔ Handling Cancelled or Modified Loaners
- Loaner Closed / Returned: Once the finish date (plus the “after” buffer) is in the past, the VISOR group is deleted on the next sync run and the user’s slot is freed.
- Loaner Extended: A loaner whose finish date is pushed further into the future will keep its existing VISOR group — Hector uses the refreshed expiry on the next run to decide when to revoke.
- Loaner Shortened or Cancelled: The group will be removed automatically as soon as the new expiry falls in the past. If you need the revocation to happen immediately, you can trigger the Access Sync manually after saving the change.
🚫 Integration Constraints
- Email must be populated on every VISOR user: Badge holders without an email on their VISOR profile will never be matched to a Hector user and therefore will never receive access through a loaner.
- 10 concurrent groups per user: A VISOR user can hold at most 10 access groups simultaneously. If a borrower reaches this ceiling, new grants are deferred until an existing group expires and frees a slot. This includes any non-Hector groups manually assigned in VISOR, so keep some slots free for Hector’s use.
- Place coverage: Only Places explicitly listed in the Readers mapping trigger access. If a loaner contains a mix of mapped and unmapped Places, only the mapped ones are authorized on the VISOR side — the loaner is not rejected or split.
- User Sync must run first: The Access Sync assumes the borrower has already been linked to a VISOR user. A loaner assigned to a Hector user with no VISOR match will be skipped with a warning.
- No manual edits in VISOR: Groups named
Hector-*are managed exclusively by Hector. Renaming or deleting them manually inside VISOR will break the link and the group may be recreated on the next cycle.
We hope this guide was helpful and best of luck on your Hector journey!