Do you want Hector to help you reconcile what is on your shelves against what is in the database, on a one-off basis or on a recurring schedule, and walk you through every discrepancy until the inventory matches reality?
The Inventory Count module does exactly that. This guide explains why to use it, how to configure it, and how to run a count from creation to closure, including the new V2 capabilities: the counting tab, the progress tab, the statistics tab, recurring counts, the adjustment phase, the counts dashboard, reports, and email/printout templates.
🎯 Why run inventory counts in Hector?
Even a well-maintained inventory drifts over time: assets are moved without being logged, kits are split, items are lost, employees leave with equipment. An inventory count lets you:
- Catch and correct discrepancies before they show up in an audit or a budget review.
- Measure your Stock Record Accuracy (counted quantity vs expected quantity) at the location, category, or organization level.
- Validate employee-held assets on a recurring basis (for example every six months).
- Split a large count across several people, several shelves, or several sessions, and resume from where you left off.
- Generate the documentation and audit trail required by your finance or compliance team.
📋 Prerequisites
- The Inventory Count module must be enabled on your instance. It is available on the Armor and Castle subscription plans only — if you are on a lower plan, contact Hector to upgrade.
- You must have a role with at least the View permission on Inventory Counts, plus New or New (Limited) to create them, Count to perform scans, and Adjust to resolve discrepancies. See the Permissions section at the end of this article.
- The inventory you intend to count must already be in Hector — categories, parts and assets must be created, and assets must be assigned to a Stockroom (and optionally a Racking, Place or Space).
🗺️ Plan your count
Before you create your first count, set yourself up for success. A few minutes of planning saves hours of cleanup afterwards.
- Start small. For a first count, pick a location with fewer than 100 assets. You will learn the scanning workflow without the pressure of a full-scale audit.
- Tag the inventory first. Confirm every asset has a barcode or QR code that exists in Hector. If a wave of new tags is needed, generate them from Hector and print them on a thermal printer before counting day, so the counters can scan instead of typing.
- Brief and equip the counting team. Identify exactly who will count, confirm they each have a Hector account with the Count permission, and have them log in at least once before the count begins. Decide ahead of time whether they will count on a phone, a desktop with a USB scanner, or paper sheets.
- Freeze the inventory. Communicate to other teams that assets must not move in or out of the counted location during the count. Use the Entity Lock option (see Step 2) to enforce this in Hector. Do not schedule counts on your busiest operational days.
- A count is not detective work. If an asset is missing, record it as missing and move on. Investigations happen during the Adjustment phase or afterwards, not during scanning.
⚙️ Step 1: Configure global count settings
Global settings define the defaults every new inventory count will inherit. You only have to set them once. Go to the Settings menu, then Inventory Counts. The page is organised into two top-level tabs: General and Display.
🛠️ General tab
The General tab is split into three sections — Default Configuration, Adjustment and Approval.
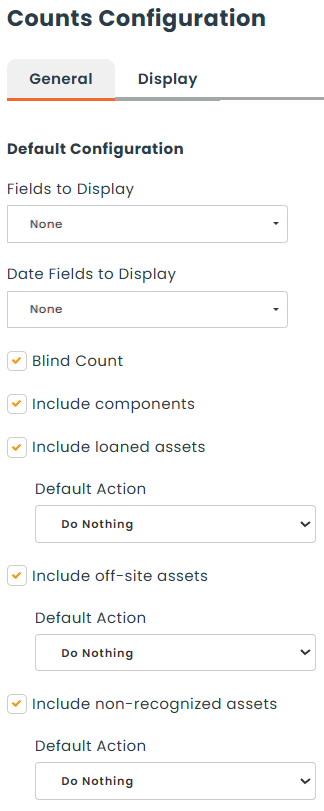
📐 Default Configuration
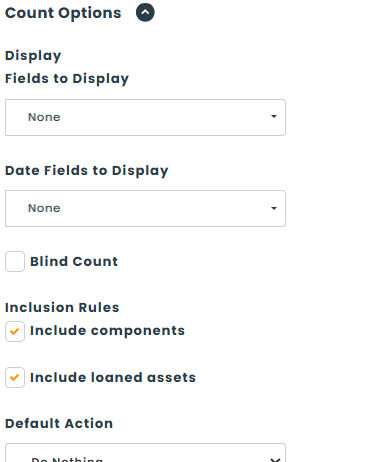
- Fields to Display — pick which asset fields are shown on the asset card while a count is being performed (image, condition, unit price, note, attributes, etc.).
- Date Fields to Display — similar to Fields to Display, but only for date fields.
- Blind count — when checked, expected quantities are hidden from the counters during scanning. Expected values reappear during the Adjustment phase so the approver can resolve discrepancies.
- Include components — when checked, kit components are listed as countable rows alongside their parent kits. Unchecked, components stay hidden on the count list (still visible inside the kit card).
- Include loaned assets — when checked, assets currently on loan are part of the count. Checking the box reveals a Default Action dropdown with two options:
- Do Nothing — leave the loaned asset out of the count’s working list; the loan record is untouched and the asset is ignored during scanning.
- Add Asset to Current Count — automatically add the loaned asset to the count so the counter can confirm its status (Found / Found on Loaner / Missing) like any other asset.
- Include off-site assets — when checked, scanning an asset that belongs to a stockroom other than the one being counted records it on the count instead of rejecting the scan. Checking the box reveals a Default Action dropdown with two options:
- Do Nothing — flag the off-site scan on the count for review (the asset’s home stockroom is not changed).
- Move Asset to Current Count — re-home the off-site asset to the stockroom being counted at the moment of the scan, and count it normally.
- Include non-recognized assets — when checked, scanning a barcode that is not in the count’s expected list is accepted instead of rejected. Useful for catching brand-new or mis-tagged assets during a count. Checking the box reveals a Default Action dropdown with two options:
- Do Nothing — record the unknown barcode on the count for later triage but do not create any asset record.
- New Asset — create a brand-new asset record on the spot, with the scanned barcode as its identifier, and add it to the count as Found.
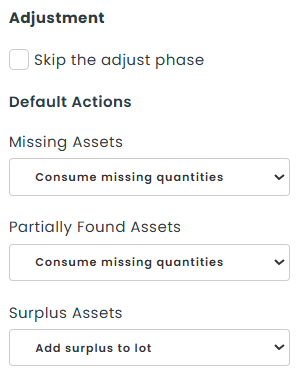
🔧 Adjustment
- Skip the adjust phase — when checked, counts move directly from In Progress to Completed on Finish, without an explicit Adjustment phase. Discrepancies are handled by the Default Actions below instead of by a human in the Adjustment grid.
- Default Actions — three dropdowns covering what happens to assets of each discrepancy type when the Adjustment phase resolves them:
- Missing Assets — what to do when an expected asset is not counted. Options: Do Nothing (no inventory change, the asset stays as-is), Consume missing quantities (archive the missing quantity as lost), Move (transfer the asset to another location, useful when a missing asset is suspected to be elsewhere).
- Partially Found Assets — what to do when the counted quantity of a lot is lower than expected. Same three options as Missing Assets above (Do Nothing, Consume missing quantities, Move); the action applies to the missing portion only.
- Surplus Assets — what to do when the counted quantity is higher than expected. Options: Add surplus to lot (create a new lot with the surplus quantity at the counted location), or Move surplus (rebalance the surplus to a different lot or location).
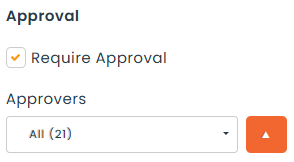
👍 Approval
- Require Approval — when checked, an Approvers multi-select appears so you can pick the user groups whose members are allowed to approve counts. When unchecked, counts move straight from creation to counting and the multi-select is hidden.
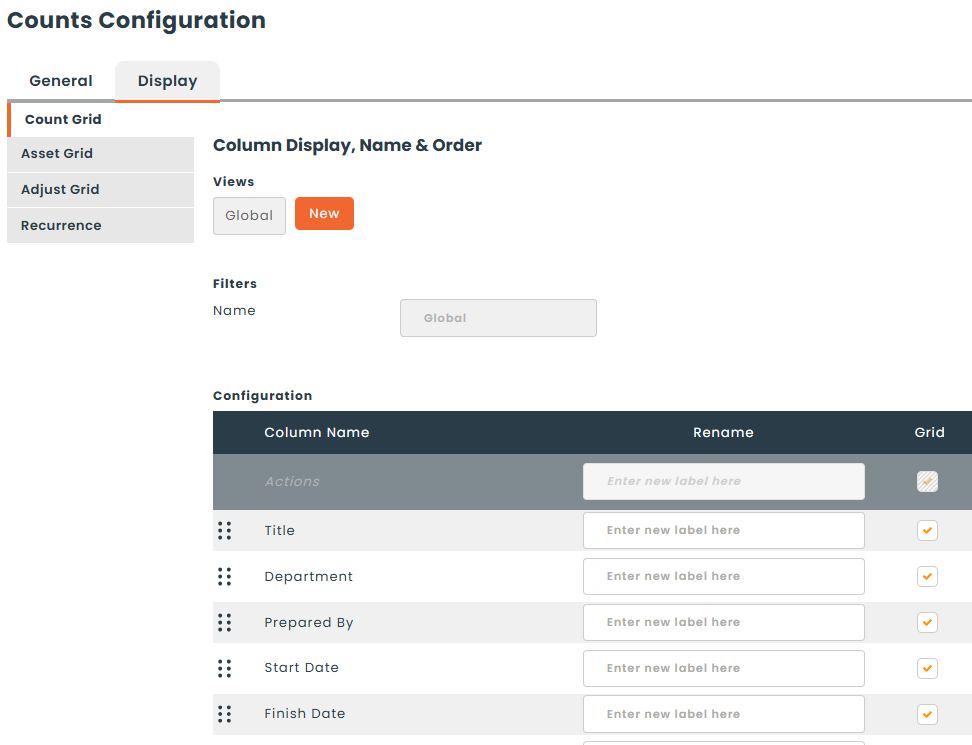
🎨 Display tab
The Display tab holds the column personalization for every grid related to inventory counts. Choose which columns appear and in which order. The tab is split into four sub-tabs:
- Count Grid — the main Counts list (Inventory > Counts), columns visible per row.
- Asset Grid — the per-count item list shown on the count detail page and the Progress tab during the Counting phase.
- Adjust Grid — the exception grid used in the Adjustment phase.
- Recurrence Grid — the Recurrences tab of the Counts list.
Click Save at the bottom of the page when you are done. Settings apply to new counts created afterwards; counts already in flight keep the settings they were created with.
ℹ️ Note: each global setting above is exposed again on the New count form, where it can be overridden for that specific count.
🆕 Step 2: Create a new count
From the Counts menu, open Inventory Counts and click New Inventory Count.
🔀 Choose the Count Type
The first decision on the form. Two clickable cards at the top:
- Single Count — a one-off count, performed once.
- Recurring Count — a template that regenerates a fresh count on a fixed cadence (e.g. every 90 days). Selecting Recurring Count reveals the Frequency field further down in the General Information section.

🏷️ Entity
Pick what (or whose) assets the count will cover. Six choices are available; picking one reveals the matching sub-selector below the choice row.
- Stockroom — count every asset in one stockroom. A multi-select labelled with the chosen stockroom appears underneath; leave it empty to count the whole stockroom, or pick one or several Rackings to scope the count.
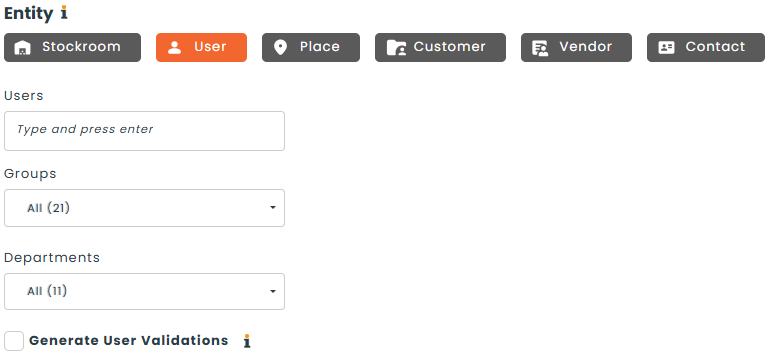
- User — count assets assigned to one or several users. Pick users individually via the Users autocomplete input; further filter by Groups and Departments. A Generate User Validations checkbox is offered immediately below: when checked, each selected user is asked to confirm their own assets — see Inventory Validations for the full flow.
- Place — count every asset in one Place. A multi-select for Spaces appears below; leave it empty to count the whole Place, or pick one or several Spaces to scope the count. Space is always a sub-filter of Place — it is not selectable on its own.
- Customer — count assets currently associated with one customer.
- Vendor — count assets associated with one vendor.
- Contact — count assets associated with one contact.
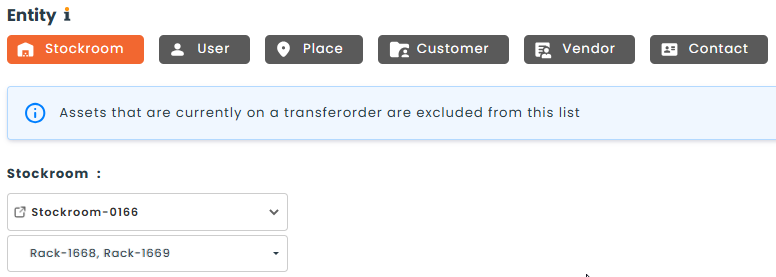
🔒 Entity Lock
The Entity Lock checkbox sits immediately below the entity selectors. When checked, every asset inside the counted entity is frozen for the duration of the count — no one can move it, no one can loan it out — so the inventory the counters are scanning cannot shift under their feet. Concretely, while the count is in In Progress:
- The Move action is removed from every asset inside the locked entity (the option disappears from the asset’s action menu).
- When moving an asset that is not inside a locked entity, the destination field hides every locked entity — so you cannot accidentally move stock into a place that is currently being counted.
- Locked assets are hidden from the Loaner module — they cannot be loaned out and do not appear in loaner-related lists.
Users do not get an explicit “locked” error — the action or the entity simply does not appear, so no transaction can be started against the assets. When the count moves out of In Progress (Adjustment, Completed, Archived, or Cancelled), everything is released and the assets behave normally again.
🔎 More Filters
Open the collapsible More Filters block to narrow the count to specific categories or parts. The choices offered in each multi-select are scoped automatically to whatever exists inside the chosen target — for example, if the selected stockroom only contains Computers and Drills, those are the only Categories you can pick.
- Categories — restrict the count to one or several categories.
- Parts — restrict the count to one or several parts.

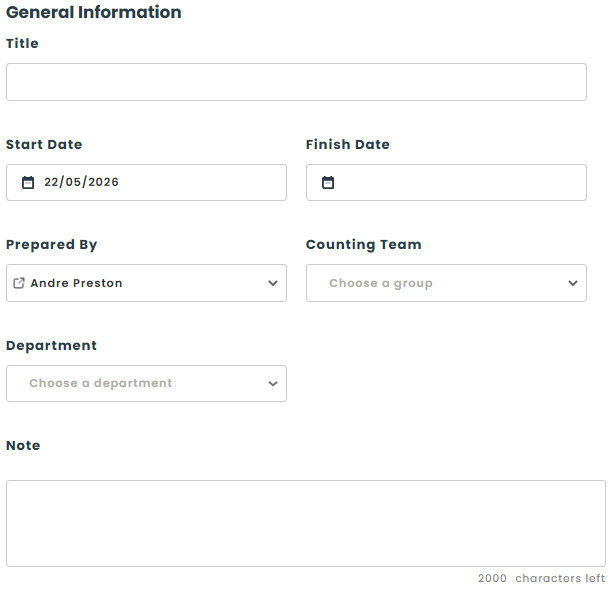
ℹ️ General Information
- Title — free-text name shown in every grid, report and printout. Required.
- Start Date and Finish Date — when the count should start and finish.
- Frequency — visible only when the Count Type is Recurring Count. Choose an interval (days, weeks, months); a new count regenerates automatically that interval after the previous one closes.
- Prepared By — the user who set up the count. Defaults to the current user; can be reassigned to another user before save.
- Counting Team — the group of users authorized to perform the count. The team also controls who sees the count when View (Limited) permissions are used (see the Permissions section).
- Department — the department responsible for the count.
- Note — free-text notes. The field remains editable through the In Progress and Adjustment phases so the counters can leave context for the approver.
🎛️ Count Options
The Count Options accordion sits at the bottom of the form, collapsed by default; click the header to expand it. It mirrors the three sub-sections of the global settings page from Step 1: Default Configuration (renamed here as Display), Inclusion Rules, and Adjustment – Default Actions. Every field in the accordion defaults from the matching global setting and can be overridden for this particular count only.
See Step 1: Configure global count settings for what each option means and the exact choices each dropdown offers.
💾 Save options
The save button at the bottom of the form is a split button. The available options depend on whether Require Approval is turned on in the global settings.
Approval not required — the new count moves immediately to a workable state. Available options:
- Save as draft — the count is saved with the Draft status and lands in the Draft tab. You can come back later and edit any field.
- Save & List — the count moves to the Approved status, you are redirected to the counts list, and the count appears in the Approved tab.
- Save & View — same as Save & List, but you are redirected to the count’s detail page.
- Save & Count — the count moves directly to In Progress and you land on the counting page, ready to scan.
Approval required — the count must be approved before it can be counted. Available options:
- Save as draft — same as above; lands in the Draft tab.
- Save & Send for Approval — the count moves to Pending Approval and is visible to every user in the approval group. From there, an approver can Approve the count (moves it to Approved) or Refuse it (moves it to Refused).
📒 Step 3: The Counts list
The Counts list at Counts > Inventory Counts is your central dashboard for every count, organised into tabs by status. Within each tab, the columns shown on every row are driven by Settings > Inventory Counts > Display > Count Grid — an administrator can add, remove or reorder columns there (see Step 1), so what you see may differ slightly from the screenshots in this article.
The tabs are:
- All — every count regardless of status.
- Draft — counts saved as a draft.
- Pending Approval — counts awaiting an approver’s decision.
- Approved — counts that have been approved (or that skipped approval) but not yet started.
- In Progress — counts currently being scanned.
- Late — counts whose Finish Date has passed without the count being closed.
- Adjustment — counts whose Counting phase is complete and that have discrepancies to resolve.
- Completed — counts fully resolved but not yet archived.
- Archived — counts archived for audit purposes; read-only.
- Refused — counts that an approver declined.
- Cancelled — counts cancelled before completion.
- Recurrences — the templates behind your recurring counts (see Step 7).
Each row exposes an Action menu whose contents depend on the current status: View, Edit, Count, Print, Cancel, Duplicate, Delete, and so on.

🔍 Step 4: Run the count (Counting phase)
From the Counts list, choose Start Count on a New count, or use Save & Count at creation. The count moves to In Progress and the counting page opens. Two action buttons are always visible at the top: Save & Quit and End count.
The counting page is split into three boxes plus three tabs:
- Asset being verified (left) — details and editable fields for the asset you are currently counting.
- Count List (right) — every asset that belongs to the count, with current status and remaining counts.
- Recently Counted Assets (bottom) — the last few assets you scanned, with the count in parentheses in the header.

🔍 The Count tab
The Count tab is where the scanning happens. Two scan modes are available:
- Search — type a barcode, asset number or title in the search field of a column, pick the matching row from the list, and the asset opens in the Asset being verified box. Edit the quantity (defaults to 1), set the condition or note, and click Save.
- Quick scan — point a USB barcode reader at the Quick scan search field. As each scan arrives, Hector matches the asset and:
- Sets the quantity to 1 for unit-tracked assets, or adds 1 to the running count for lot-tracked assets (each scan increments).
- Updates the line’s status based on the resulting quantity vs the expected quantity — the line becomes Found (exact match), Found Partially (counted less than expected), or Found Surplus (counted more than expected).
- Adds the asset to Recently Counted Assets.
- Returns focus to the search field for the next scan.
At any time you can filter the Count list to a specific Racking (or Space, for a Place-level count). The dropdown shows the percentage of completion next to each option, and any scan of an asset outside the current filter is flagged so you can decide to move it or leave it.
⚠️ Special cases during scanning
- Asset out of the counted location — Hector displays an info bubble and lets you flag the asset for relocation or include it anyway.
- Asset on a loaner — when you scan an asset that is currently out on loan, Hector flags it and lets you add it to the count (per the count’s Include loaned assets rule).
- Asset not in the database — when you scan a barcode that doesn’t exist in Hector, the line is created with status Unknown. Depending on the count’s Include non-recognized assets rule, the unknown scan is either flagged for later triage or converted into a brand-new asset on the spot.
- Kits and components — kits and components are shown in distinct colors (components are highlighted in light blue). For a component, the Location column links to the parent kit (opens in a new tab). A kit gets the status Kit (components partially validated) as soon as at least one component is validated, and Kit (components validated) once all components are validated. A “Validate all components of the kit” checkbox is available on the kit’s card to confirm them in one click after a visual check.
✏️ Editing fields on the asset card
Beyond setting the quantity, the Asset being verified panel lets you correct the asset’s metadata on the spot, without leaving the count. Which fields render is driven by the count’s display configuration (see Step 1‘s Fields to Display), but the following inline edits are always supported when their fields are part of the card:
- Condition and Note — set the new condition or attach a per-asset note, then click Save.
- Category and Part — can only be set when the card represents a brand-new asset created on the spot via the Include non-recognized assets > New Asset path (after scanning a barcode that doesn’t exist in the database). If you need to change an existing asset’s Category or Part, edit it from the asset’s own detail page after the count.
- Sub-location — appears on the card when you scanned an off-site asset (one that doesn’t normally belong to the count’s location) and want to add it to this count. Pick the count’s sub-location where the asset should be recorded — a Racking for Stockroom counts, a Space for Place counts, etc.
- Image — if the count’s display fields include the Img column, the asset card exposes an image upload.
- Custom attributes — any attribute included in the count’s Fields to Display renders on the card and is editable inline.
The propagation moment is important to know: inline edits stay on the count line during the Counting phase and only flow back to the master asset when the line is Accepted in the Adjustment phase. This lets you use a count as a metadata-cleanup pass and review every proposed change before it touches production data. If you Ignore a row, none of its edits propagate — the master asset is left untouched. If you check the asset right after clicking Accept, allow a moment for the update to settle.
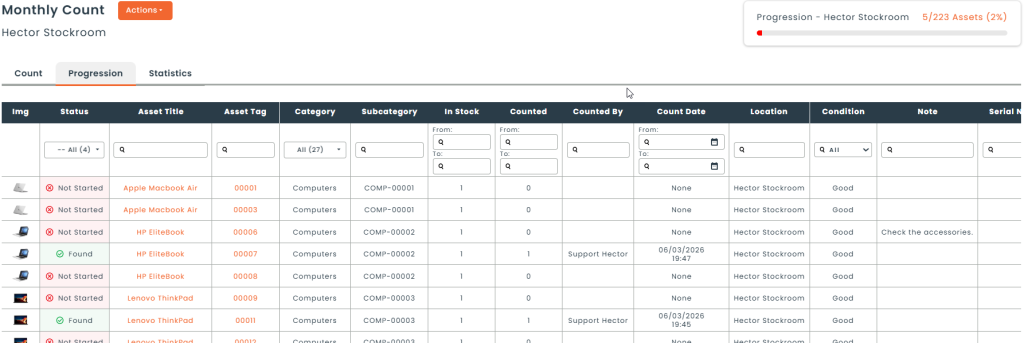
📊 The Progression tab
The Progress tab gives you a table of every asset in the count. The columns are driven by Settings > Inventory Counts > Display > Asset Grid (with per-count overrides in Step 2‘s Count Options accordion), so the column set may differ from one instance to another. Filter by status (Counted / Not counted) and read the color codes:
- Red — Not Started (asset still to count), Missing (after the count finishes), or Flag as Missing.
- Green — Found at the expected quantity.
- Orange — Found Partially, Found Surplus, On Loaner, Off-Site, or Unknown — a discrepancy that needs review during the Adjustment phase.
- Indigo — Found (on Loaner), Found and Move, or a new asset created on the spot via the Include non-recognized assets rule.
ℹ️ Note: when Blind Count is on, statuses that would reveal a discrepancy are remapped — Found Partially and Found Surplus render green (same as Found), and On Loaner / Off-Site / Unknown variants render indigo. Expected quantities and the original colors reappear during the Adjustment phase.
Use this tab when you are running a long or split-session count to see at a glance what is still left to scan.
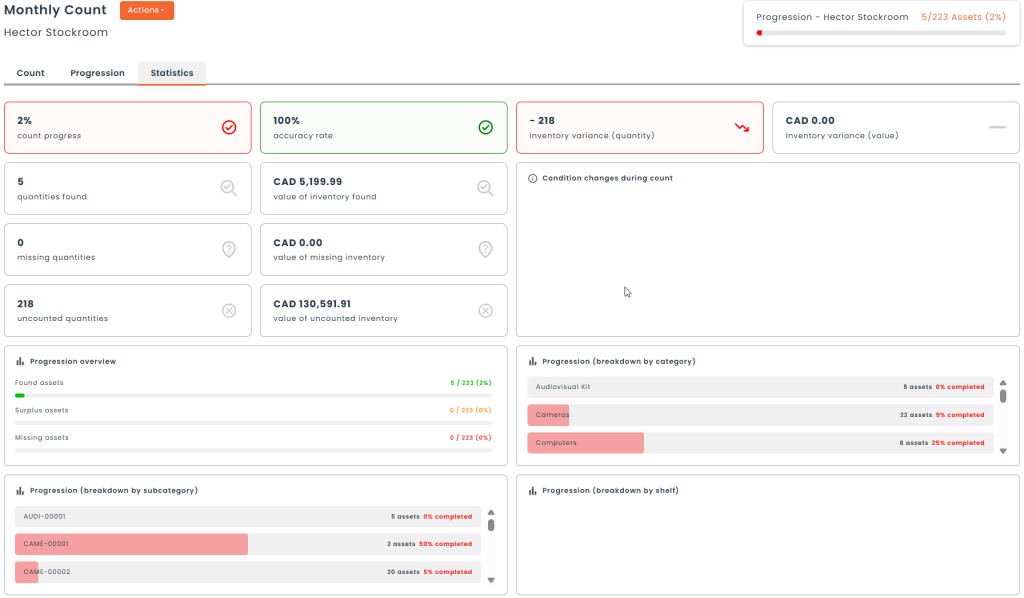
📈 The Statistics tab
The Statistics tab gives a live, multi-panel snapshot of the count. The tab is organized into three groups of widgets — metric tiles, progression breakdowns, and summary lists.
📌 Metric tiles
Ten single-number tiles at the top of the tab. The first four are headline metrics; the rest are paired count / value tiles:
- Count progress — overall % of items the team has touched.
- Accuracy rate — counted quantity divided by stock quantity, as a %.
- Inventory variance (quantity) — surplus units minus missing units.
- Inventory variance (value) — same idea in currency.
- Quantities found and Value of inventory found — count and $ of items confirmed found at the expected quantity.
- Missing quantities and Value of missing inventory — count and $ of items expected but not yet found (these are also the items still To Count during the counting phase).
- Uncounted quantities and Value of uncounted inventory — items the team has skipped or not yet reached.
The tiles are read-only — they refresh automatically as the count progresses but are not clickable. To see the rows behind a number, switch to the Progress tab and use the status filter there.
📊 Progression breakdowns
Four bar-chart panels showing the count from different angles.
- Progression overview — three colour-coded rows: Found assets (green), Surplus assets (orange), Missing assets (red), each as count / total (%).
- Progression (breakdown by category) — completion % per category (e.g. Cameras, Chairs, Computers).
- Progression (breakdown by part) — completion % per part — useful when a count spans many parts of the same category.
- Progression (breakdown by racking) — completion % per racking — useful for stockroom-level counts that span multiple rackings.
📋 Summary lists
Three text-and-counter panels at the bottom of the tab that surface special-case items and audit data:
- Condition changes during count — one row per condition changes that was recorded during this count, with the number of affected assets and the total value moved.
- Detected irregularities — quick counters for the special-case statuses surfaced during scanning: Surplus quantities, Unknown assets, Out-of-stockroom assets, Assets on loan.
- Irregularities management — counters for items the team has explicitly handled: New assets created (via Include non-recognized assets), Out-of-stockroom assets adjusted, and Loaned assets adjusted to count.
📄 Counting on paper
Some counts are easier to run on paper — large warehouses without Wi-Fi, audits performed by an external team, or teams without a Hector account. The paper workflow uses Hector’s Print template system (see the Email and printout templates section): a default Inventory Count printout template ships with the module, and administrators can build customised templates that include the columns and ordering they need (asset number, title, location, expected quantity, blank columns for counted quantity / counter / date, kit / component breakdown, and so on).
To run a paper count:
- From the count’s action menu, click Print and pick the template you want to use (the default Inventory Count template or one of your customized templates). Hector renders one row per expected asset based on the template configuration.
- Hand the sheets to the counting team. They tick, annotate and sign the paper as they go.
- When the team returns the sheets, open the count in Hector and transcribe the results — either by searching each asset in the Count tab, or by skipping directly to End count and entering the discrepancies in the Adjustment grid.
⏸️ Pausing and resuming a count
Counts often span multiple shifts. To stop temporarily, click Save & Quit in the header: everything you scanned is persisted and the count stays in In Progress status. Re-open the count later from the Counts list or from the My Inventory Counts page and pick up where you left off.
✅ Finishing the Counting phase
Click End count when scanning is complete. What happens next depends on the Skip the adjust phase setting under Settings > Inventory Counts:
- If Skip the adjust phase is off (the default), the count always moves to the Adjustment phase — even when every asset matched expectations — so the admin can review every line and apply any necessary actions before completing.
- If Skip the adjust phase is on, the count moves directly to Completed and the configured default actions are applied automatically to any discrepancies.
🔧 Step 5: Resolve discrepancies (Adjustment phase)
When you click End count, the count moves into the Adjustment phase so the admin can review every line — exceptions and matches alike — and apply any necessary actions. (If Skip the adjust phase is on under global settings, the Adjustment phase is bypassed entirely and the count goes straight to Completed.) The Adjustment page is purpose-built for resolving discrepancies one row at a time. The columns visible in the Adjustment grid are driven by Settings > Inventory Counts > Display > Adjust Grid — see Step 1 if you need different columns from what is shown below.
🧭 Page layout
- Entity sub-filter dropdown — when the count covers several Rackings (Stockroom counts), Spaces (Place counts) or Users (User counts), scope the grid to one of them. The choice persists across saves.
- Progression label + progress bar — live indicator of how many exception rows have been resolved (Accepted or Ignored) vs the total. The bar fills and the percentage updates after every save.
- Asset list — every exception in a single grid with a filter row and per-row action menu. Inline-editable columns: Count Qty, Condition, Unit Price, Note (plus any custom attributes the count is configured to show).
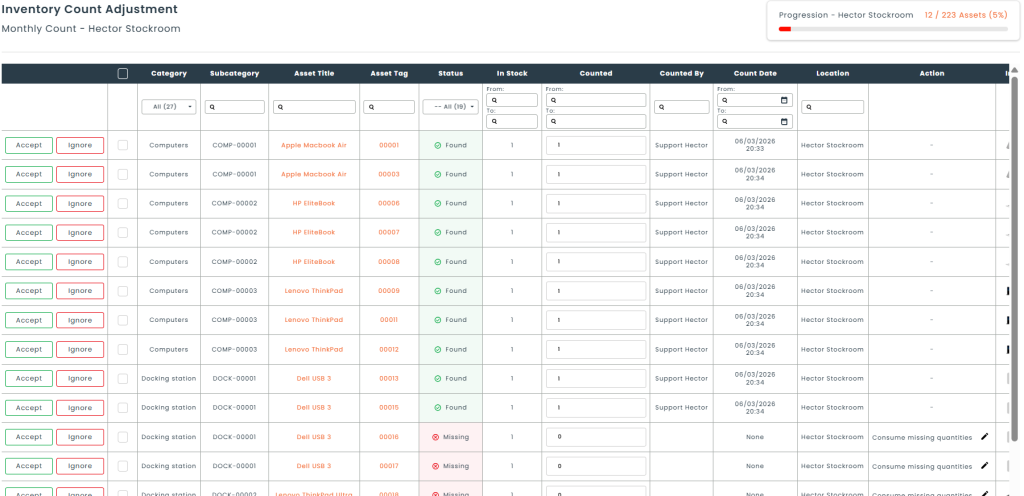
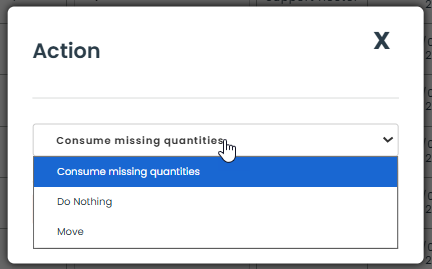
🎯 Per-row action
Each exception row has an Action cell that shows the chosen resolution, plus an edit pencil opening a “Choose an Action” modal where you switch action and (if applicable) pick the destination. The choices depend on the discrepancy type:
- Missing rows (and the missing portion of Found Partially rows) — three options:
- Do Nothing — leave the inventory record untouched.
- Consume missing quantities — archive the missing quantity with the configured archive status (e.g. Lost).
- Move — record the missing quantity as moved to another location; pick the destination Stockroom / Racking / Place / Space.
- Found Surplus rows — two options:
- Add surplus to lot — create or increment a lot with the surplus quantity at the counted location.
- Move surplus — transfer the surplus to another lot or location.
The per-row action options are driven by the counted vs expected quantity, not by the original status. Off-Site, On Loaner and Unknown rows that were not added to the count (counted quantity stayed at 0) appear in the grid for review only and don’t need a per-row action. But if one of those rows was added to the count and is now Found, Found Partially, or Found Surplus, it gets the same per-row action options as a regular Missing / Partial / Surplus line.
✅ Accept / Ignore per row
Each row carries two buttons on the left:
- Accept — confirms the chosen action. Once accepted, the row shows Accepted (read-only) and contributes to the Progression bar.
- Ignore — sets this row aside (no inventory change will be applied). Once ignored, the row shows Ignored and also counts toward Progression.
Both states are reversible — click again to undo. A row that is neither Accepted nor Ignored remains pending and keeps the count from completing.
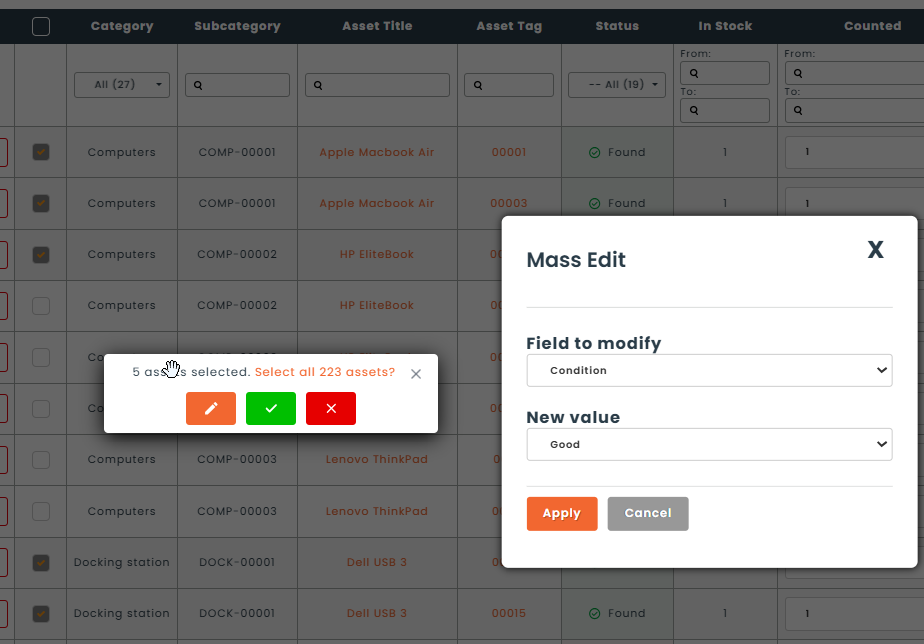
📑 Bulk edit across rows
To edit many rows at once, tick rows in the leftmost selection column (or use Select all from the grid header) then change the value in the column you want to apply — Counted quantity, Condition, Unit price, etc. The change applies to every selected row in one save.
💾 Saving and completing
Two split-button save options at the bottom of the page:
- Save & Next — persist the row decisions. If more rows still need adjustment, you stay on the page to continue. If every row is now Accepted or Ignored, the count moves to Completed and you are redirected to its View page.
- Save & List — persist the row decisions and return to the Counts list (with the count moved to Completed if all rows are resolved, otherwise still in Adjustment).
A Cancel / Back button next to the save split-button returns to the previous page without persisting unsaved Accept / Ignore decisions or inline edits.
🗄️ Step 6: Archive the count
A Completed count is still editable for audit cross-checks. When you are satisfied with the result, open the Action menu and click Archive. The count moves to Archived and becomes read-only.
🔁 Step 7: Manage recurring counts
Recurring counts are templates that Hector uses to generate a fresh count on a fixed cadence. Once the previous count is closed and the frequency interval has elapsed, the new count appears automatically in the Approved tab of the Counts list.
Manage your recurrences from the Recurrences tab of the Counts list. The default grid columns are:
ℹ️ Note: the columns shown below are the defaults that ship with the module. An administrator can change which columns appear (and in which order) via Settings > Inventory Counts > Display > Recurrence Grid — see Step 1. If your screen looks different from this article, check those settings.
Default columns:
- Title — the title of the latest count generated from this recurrence.
- Entity — what the recurrence counts (stockroom name, place name, list of users, etc.). For user-based recurrences with no specific user picked, this column shows the generic Users label.
- Frequency — prefixed with “Every”, e.g. “Every 90 days”.
- Enabled — Yes / No flag indicating whether the recurrence will keep generating new counts (toggled via the Deactivate / Reactivate actions below).
- Counts Generated — the number of counts this recurrence has produced so far.
- Last Generated Count — date of the most recent generation.
- Last Count Status — status of the most recently generated count (Draft / Approved / In Progress / Completed / Archived / etc.).
- Next Count Date — when the next count will be generated. Empty while the recurrence is disabled.
The Action menu of a recurrence offers:
- View — opens the latest generated count on its View page. Requires the View permission on Inventory Counts.
- Deactivate Recurrence — when the recurrence is Enabled, stops further auto-generation while preserving the history of past counts. Requires the Edit permission.
- Reactivate Recurrence — replaces the Deactivate action when the recurrence is paused. Resumes the cadence from the next due date.
- Delete — only offered while the recurrence is paused (Enabled = No). Requires the Delete permission and the standard delete confirmation.

👤 The My Inventory Counts page
The My Inventory Counts page is reached from the home page (Workspace), not from a top-level navigation menu. On the home page you will find a Counts : My Inventory Counts tile that previews up to five counts you are part of (most recent first); the tile carries a See more link at the top right that opens the full My Inventory Counts page.
The tile and the full page only appear if your role has the Mine permission on Inventory Counts (set in Settings > Roles, under the home-page / workspace section labelled Counts : My Inventory Counts). If you do not see the tile after logging in, ask an administrator to grant the permission, or to add the tile back via the home page’s customisation panel if it has been hidden.
The page shows every count you belong to as a member of the count’s Counting Team, restricted to counts currently in In Progress, with the title, current status, percentage progress, begin and finish dates. The list refreshes whenever you save progress in a count, so it doubles as your task list during a counting day.
✉️ Inventory Validations
When you create a User-entity count with Generate User Validations ticked (see Step 2) and move that count to In Progress, Hector ships each user a personal self-check form alongside the central count. The forms are only created at Start — saving as Draft or Pending Approval doesn’t send anything to users yet. The form is the user’s chance to confirm what they actually have, flag what they are missing, and report anything in their possession that the count did not anticipate — and every answer feeds directly back into the count grid the counting team sees.
💡 When to use it
User validations turn a count into a self-serve exercise — your team doesn’t have to chase every user down. Common scenarios:
- Remote, hybrid, or distributed workforces. Employees with laptops, monitors, headsets, or phones at home or in the field — a counting team physically can’t walk to each location, so each user confirms their own gear instead.
- Annual or periodic compliance audits. Insurance, SOX, ISO, or end-of-fiscal-year sign-offs that require each user to attest to what they hold. The signature captured on the form gives you a dated, per-user paper trail.
- Personal-issue assets. Laptops, phones, tools, PPE, uniforms, vehicles — anything that lives with the user rather than in a stockroom is faster to validate by asking the user than by scanning.
- Onboarding / offboarding hygiene. Periodic check that long-tenured users still hold (and still need) everything the system says they have, and a chance to surface items quietly transferred between colleagues.
- Surfacing untracked assets. The “assets in my possessions that were not mentionned above” checkbox lets users report equipment that entered their hands without going through your usual intake process, so you can bring it into Hector.
A user-based count can also be run without validations — leaving Generate User Validations off means your counting team scans each user’s assets centrally, the way they would for a stockroom count. Use validations when reaching the users is easier than reaching the assets.
📝 What an Inventory Validation is
An Inventory Validation is a per-user record that lists every asset currently assigned to that user as of the count’s start. It lives on the user’s profile alongside the count, but the two are kept in sync: every row on the Inventory Validation form maps to a single line on the count, and changes to one update the other in real time.
🚀 What happens when the count starts
The moment the count moves to In Progress, Hector creates an Inventory Validation for each user covered by the count and sends them an email with a personal link to their validation form. The link opens the form without requiring them to sign in.
👤 The user’s view
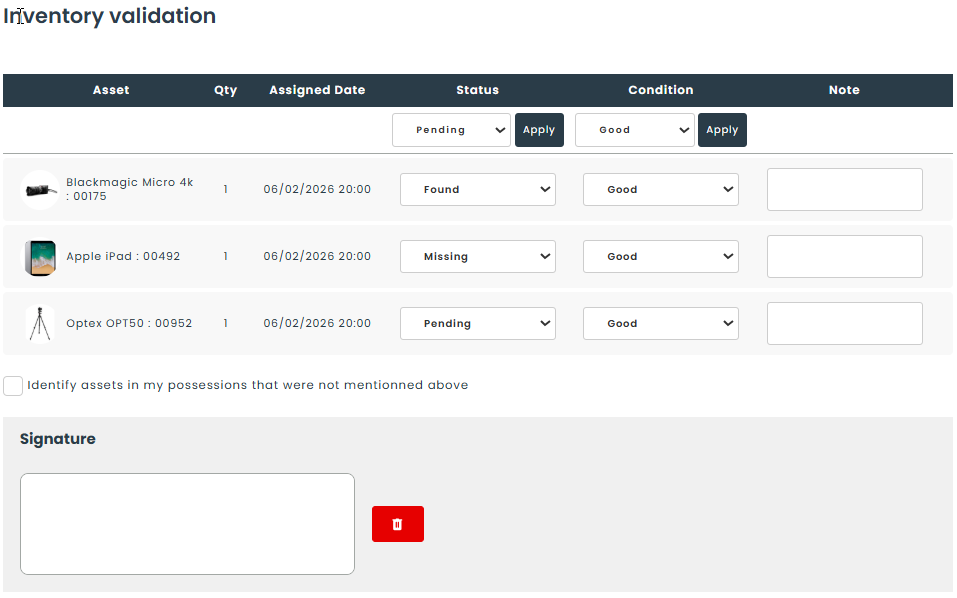
Clicking the link from the email opens the Inventory validation page, scoped to that user only. The page shows a table of their assigned assets with six columns — Asset, Qty, Assigned Date, Status, Condition, Note — and asks the user to confirm each line.
- Status dropdown: Pending (default), Found, Missing.
- Condition dropdown: Good, Poor, Broken.
- Note: free text per row, saved as soon as it loses focus.
A second row above the list lets the user pick a Status or Condition once and click Apply to broadcast it to every row at once — useful for confirming a long list quickly.
Below the table, the user can tick Identify assets in my possessions that were not mentioned above to reveal a free-text note for anything in their possession the count did not anticipate. A Signature pad is required, and the page is finalized with the Validate Inventory button.
🔁 How responses feed back into the count
Each save synchronizes the matching count line so the counting team sees the user’s input immediately on the central Count page:
| User action on validation | Effect on the count line |
|---|---|
| Status = Found | The line is marked Found, the counted quantity matches the expected quantity, and the user is recorded as the counter with a timestamp. |
| Status = Missing | The line is marked Flag as Missing, counted quantity drops to zero, and the user is recorded as the counter with a timestamp. |
| Status reset to Pending | The line goes back to Missing (not yet counted) with a zero counted quantity. |
| Condition change | The Condition column on the count is updated for that line — only effective if Condition is part of the count’s display fields (see Step 1). |
| Note edit | The user’s note appears on the count line, visible in the count grid and the Adjustment phase. |
| Validate Inventory with unlisted-assets note | A new line is added to the count with status Unknown, carrying the user’s note as its label — it surfaces as a surplus during Adjustment. |
🧑💼 The administrator’s view
From the counting team’s side, a user-based count with Generate User Validations on behaves like any other count: the Count grid is populated as users submit, the Statistics tab updates, and the Adjustment phase handles surplus lines created by unlisted-assets notes the same way it handles surplus from a scan. There is no separate “validations” tab on the count itself — the user submissions are the count data.
📊 Counts dashboard
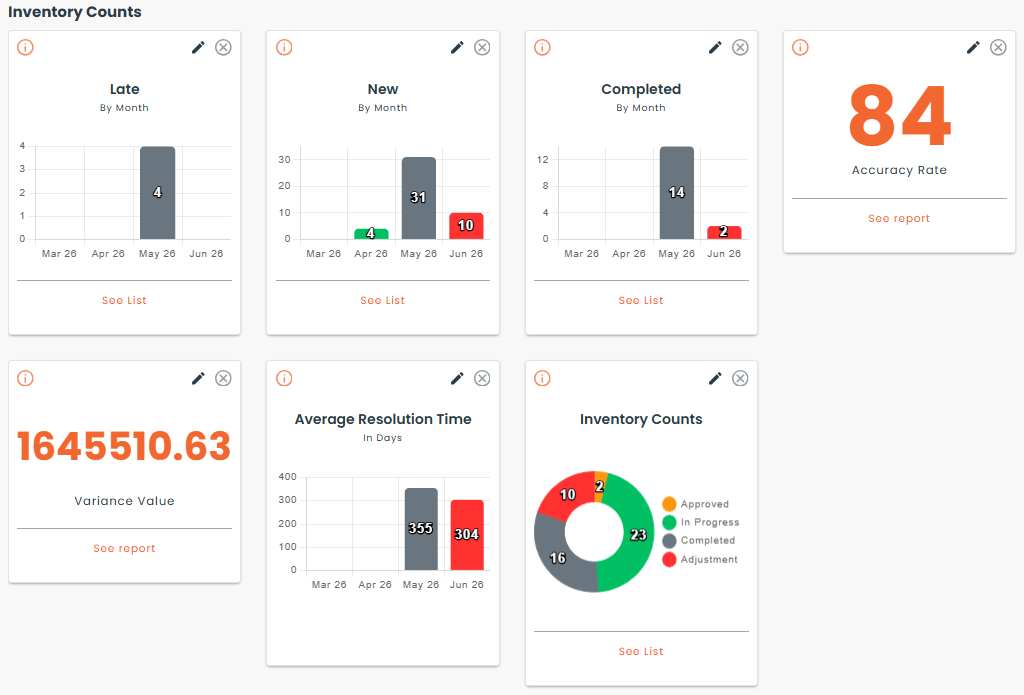
Open the Dashboard from the main menu and add any of the following tiles for Inventory Counts:
- Counts by State — donut chart of every count grouped by status.
- Late by Month — bar chart of counts whose End date has passed without being closed, grouped by month.
- New by Month — counts created per month.
- Completed by Month — counts completed per month.
- Accuracy Rate — single-number tile showing the organization-wide Stock Record Accuracy (counted quantity divided by stock quantity).
- Variance Value — single-number tile showing the dollar value of all discrepancies found during recent counts.
- Average Duration — optional tile showing the average duration in days from In Progress to Archived.
Each tile is clickable — clicking drills down to the Counts list filtered to the matching subset, or to the relevant report.
📈 Reports
The Inventory Count reports live under Reports > Inventory:
- Physical Count Summary — one row per count showing scope, dates, team, total found / partial / surplus / missing, and accuracy %.
- Physical Count Variance Detail — one row per exception line, with expected vs counted quantity, value variance, action taken and approver.
- Adjustments Audit — chronological log of every adjustment applied (quantity change, move, archive, new lot) with the actor and timestamp.
- Physical Count Accuracy Trend — accuracy % over time, suitable for a time-series chart.
- Accuracy by Category — accuracy % broken down by category.
- Accuracy by Location — accuracy % broken down by stockroom and racking.
- Stale Inventory — assets that have not been part of a successful count in a configurable number of days.
- Counter Performance — counts per user with their accuracy and average time-to-resolve, surfacing which counters are fastest and most accurate.
- Last Counted — the date each asset was last successfully counted (retained from the previous report set).
ℹ️ Note: the legacy Summary and By Year reports have been replaced by the reports above. The legacy Last Counted report is preserved as-is.
📄 Email and printout templates
Inventory Count is now available as an entity in Settings > Templates. You can build templates for either format:
- Email — used when sending a count summary to stakeholders.
- Printout — used for the Print summary action on a count.
The template editor exposes:
- General & Inventory Count header — Id, Title, Entity, Department, Counting Team, Status, Begin/End dates, Note, Frequency, audit fields.
- Prepared By / Approver blocks — user fields for the count creator and the approver.
- Categories / Parts filter blocks for templates restricted to a subset of inventory.
- Item list — filter by status group (To Count, Found, Exception) or by individual status. Available fields cover each counted line, its adjustment, the underlying category / part / asset, and the user’s inventory validation when one applies.
- Statistics — record counts (Total / Counted / Found / Surplus / Missing / Partial / Not Counted / Adjusted) plus quantity- and value-level aggregates and the accuracy %.
The printout PDF can be attached automatically when sending. A default template is provided for both formats.
🔐 Permissions
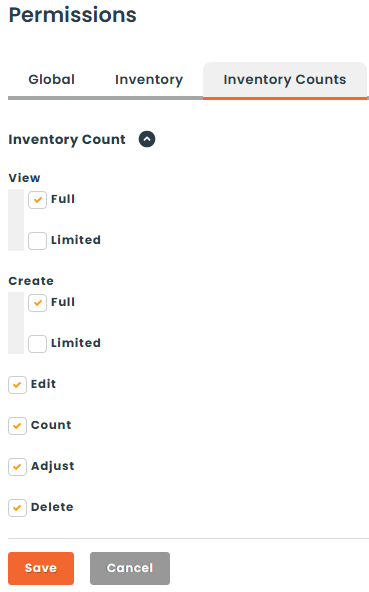
Access to the module is controlled by the following role permissions under Settings > Roles > Inventory Counts:
- View (Full) — full read access to every count in the organization.
- View (Limited) — read access only to counts the user is associated with (creator, approver, member of the counting team, or matching department).
- New (Full) — create counts against anything the role can see.
- New (Limited) — create counts only against the items the role has explicit access to.
- Edit — modify the configuration of a count after creation.
- Count — perform scans and save counted values.
- Adjust — make decisions during the Adjustment phase.
- Delete — remove counts.
- Approve — approve or refuse a count in Pending Approval (granted via the approval group selector in Step 1, not via a separate permission).
🏷️ Quick reference: count statuses
- Draft — saved but not yet sent for approval or started.
- Pending Approval — sent for approval, waiting for an approver.
- Refused — approver refused; needs to be revised or deleted.
- Approved — approved by an approver (or no approval required); ready to count.
- In Progress — Counting phase active.
- Adjustment — Counting phase finished, exceptions to resolve.
- Completed — adjustments applied; ready to close.
- Archived — archived for audit; read-only.
- Cancelled — cancelled before completion.
🏷️ Quick reference: item statuses
An item’s status during a count comes from one of three places: its position on the count’s expected list, the quantity counted vs the expected quantity, or a manual flag from the counter.
Primary statuses (driven by counted vs expected quantity)
- Not Started — the asset has not been scanned yet.
- Found — counted quantity matches the expected quantity.
- Found Partially — counted quantity is lower than expected (kits and lots).
- Found Surplus — counted quantity is higher than expected.
- Missing — expected but not counted by the end of the Counting phase.
- Flag as Missing — the counter manually flagged the asset as missing, without waiting for End count.
Pre-add statuses (asset not naturally in this count)
The next two statuses apply to assets that don’t naturally belong to this count but were encountered during scanning — e.g. an asset from a different stockroom or an asset that is currently out on loan. The counter can choose to add the asset to the count (per the count’s Include off-site assets / Include loaned assets rules); once added, the line picks up one of the four primary statuses above based on the counted quantity and is treated like any other line. If the asset is not added, it keeps its pre-add status as a flag for review.
- Off-Site — scanned during the count but belongs to a stockroom other than the one being counted.
- On Loaner — the asset is currently out on loan to someone, and was not counted in person.
Special statuses
- Unknown — a barcode was scanned that doesn’t exist in Hector. Depending on the count’s Include non-recognized assets rule, the line may be converted into a brand-new asset on the spot.
- Kit (components partially validated) and Kit (components validated) — derived statuses for kits whose components have been individually counted. Set automatically based on the components’ own statuses.