
This article will guide you on how to setup single sign-on with Microsoft Azure and Entra. In order to perform all the necessary steps in this guide, it is recommended that you be both an Administrator in the Hector Asset Management solution and an Administrator in Microsoft Azure.
Step 1- Setting up Hector
After having connected to the application, perform the following steps :
- Navigate to the Settings
- Scroll to the Protection section and then click on Security

- Select the Azure authentication method

- Authorized Domains
- You can choose to limit which domains can connect to the Hector application. This means that non authorized domains, not belonging to your organization, will get an error message when attempting to connect to the software.
- Account Required To Connect
- Leave this option unchecked to provision accounts on demand. In other words, when connecting to the application, if the user’s account does not exist, it will be created.
- You can check this option if you will be creating user accounts manually, or importing them through our SCIM integration.
- Hide login option for local accounts
- Users can sometimes get confused when connecting to the application when both the Sign in with Microsoft button is visible, as well as the Email and Password fields.
- You can hide the Email and password fields by checking “Gide login option”.
- Auto connect users
- If you want users to automatically connect to the application, check this box, and the login screen will be bypasses altogether.

Click on the Save button before moving to the next steps.
Setting up OpenId Connect
You have two options when setting up SSO Open ID Connect, and both are detailed below.
Option 1 – Use Hector’s OpenId Connect
The first option is the quickest way to setup SSO with Microsoft Azure. You will be using Hector’s OpenId Connect Settings.
Step 1
Connect to Hector using the Sign In With Microsoft button on the login page.

On the login prompt, click on “Consent on behalf of your organization” and the Accept button. If you are not connected with your Admin account, you may need to click on the “Have an admin account? Sign in with that account”.


That’s it ! You’ve completed the single sign-on guide for Microsoft Azure. If you’d like to use your own OpenId Connect settings, continue with Option 2.
Option 2 – Use Your Organization’s OpenId Connect
If you’d like to use your organization’s OpenId Connect instead of Hector’s, you can do so by clicking on the OpenId Connect Initial Setup button.

Before setting up Microsoft Azure, copy the Redirect Uri and Logout Uri as you will need them later.
Step 1
- Navigate to the Microsoft Azure Entra Id Portal.
- Click on App registrations in the Menu.
- Click on New registration.
- Give your app registration a name like Hector Open Id Connnect.
- Enter the Redirect Uri
- Click Save
Step 2
- Copy the Application (client) ID
- Copy the Directory (tenant) ID
Step 3
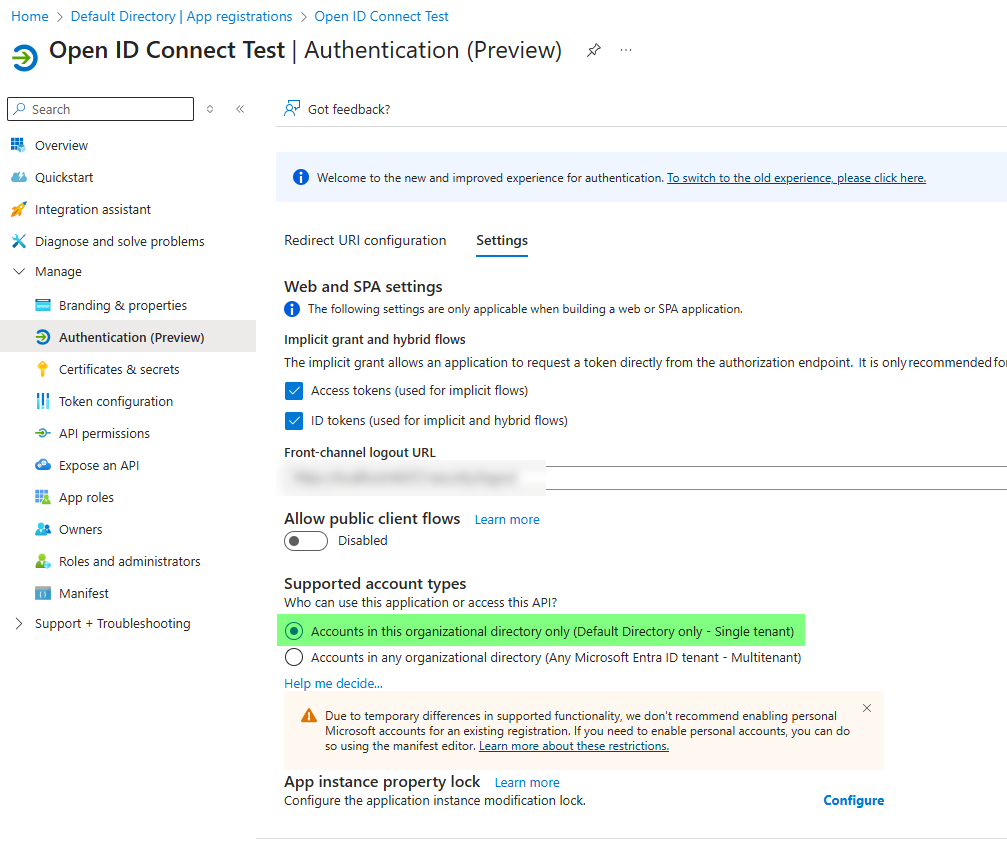
- Navigate to the Authentication section.
- Enter the Logout Uri in the area provided.
- Click on the Settings tab
- Make sure that Supported account types are set to the following value
- Accounts in this organizational directory only (Default Directory only – Single tenant)
- This setting prevents public accounts from signing into your Hector environment.
- If you want to allow public accounts, please use Hector’s Open Id Account.
- Click on both the Access tokens and ID tokens.
- Click Save

Step 4
- Navigate to the Certificates & Secrets section
- Click on New client secret.
- Give it a name, save and copy the value as you will need it in Hector (not the Secret ID).
Step 5 (optional)
- If you’d like to synchronize additional fields when users connect to Hector, click on the Token configuration section
- Add your optional claims and group claims depending on data you want to synchronize with Hector.
- Copy the claim names, as you will need them when going back to Hector.

Step 6
- Return to the Hector application
- Copy the Tenant Id in the Tenant field
- Copy the Client ID in the Client ID field
- Copy the Client Secret in the Client Secret field
- If you setup additional claims, activate them in the grid below.
Once you’re finished, click on the Save button, log out and you can login using the “Sign in with Microsoft” button. You may need to grand admin consent as seen in option 1.
Recap
Thanks for reading our Single Sign-On guide with Microsoft Azure Entra ID. You should have successfully setup both environments and you’re well on your way to reducing the number of passwords for each system in your environment. If you’re having issues setting up your environment, please don’t hesitate to reach out to our support team.