Welcome to this online guide which will show you how to, in a few quick steps, configure your Google Calendar Integration with Hector. This will allow you to synchronize your Hector loaners with your Google Calendar and/or vice versa.
From Hector you will be able to create, edit and delete Google events related to a reservation, and in Google, you will be able to Create and edit (start and finish dates or resources) Hector reservations related to an event.
1. Connect to your Google Admin account.
You must have administrator privileges in order to add Hector as an authorized App.
2. Customer ID
Once connected, click on the “Account” and “Account Settings” link on your menu and then copy your Customer ID under the Profile section, as you will need it later in the guide.

3. Domain-Wide Delegation
Next step is the domain-wide delegation. This allows certain users or applications from outside your group to read or manipulate parts of the group. In our case, you will want to add the Hector application with the privileges to read and write on your calendars. Here are a couple of lines your are going to need to configure your domain-wide delegation:
Client ID (HECTOR): 112195502243245937406
Scopes (privileges):
- https://www.googleapis.com/auth/admin.directory.resource.calendar
- https://www.googleapis.com/auth/calendar
- https://www.googleapis.com/auth/calendar.events
- https://www.googleapis.com/auth/admin.directory.user.readonly
Click on the “Security” and “API Controls” button on the menu and then click the “Manage Domain Wide Delegation” link.

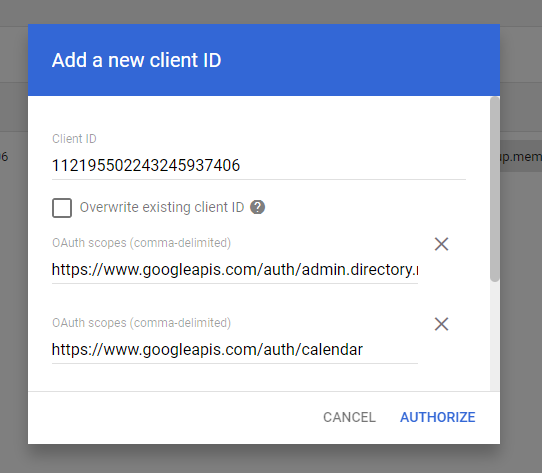
Click on the “Add new” button. Fill out the form with all the information above, then click “Authorize” (Or the “Edit” button if you already have another integration which uses the same set up).
4. Centralized Calendar Id
Unique identifier of a specific calendar in Google Calendar that you want to use as the calendar that will contain all the events created from Hector.
The use of the centralized calendar is optional. It can allow you to define a calendar that will contain all the events created from Hector and add clarity to your viewing experience.
Here is the procedure to use it if you wish. Once a new calendar is created, navigate to its settings. You will find, in the Integrate calendar section within the Calendar Settings page, the calendar ID required for the integration:

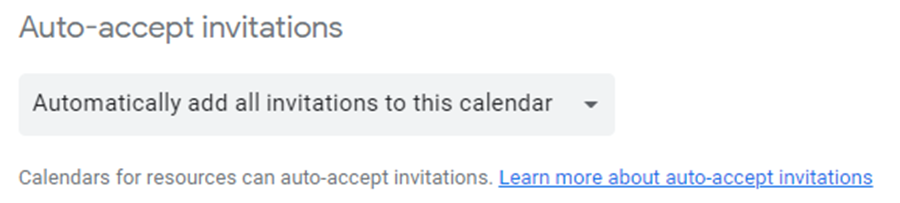
On the same page, in the Auto-accept invitations section, make sure that the option Automatically add all invitations to this calendar is selected:
5. Google Resources
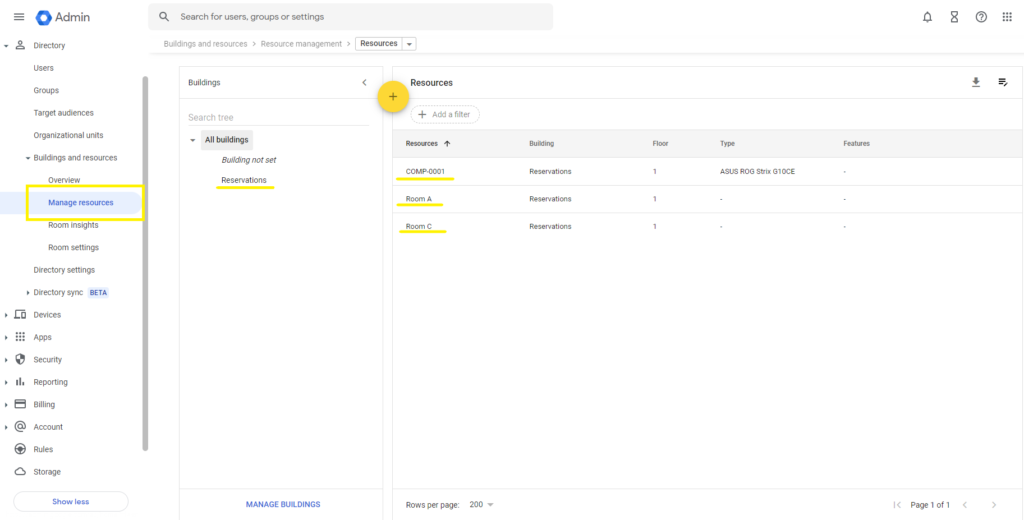
When connecting this integration, Hector will also synchronize your Google resources as assets and rooms. Since these resources are the ones who can be added to the events in your Google Calendar, Hector keeps a copy of them in order to interact with them directly in Hector and create reservations with them.
You can have access to this list of resources on your Google Workspace in the section Directory > Buildings and resources > Manage resources, and you can create as many as you want.
You have completed the Google Admin portion of the setup. Next step is to access your Hector instance as an administrator.
6. Hector Configuration
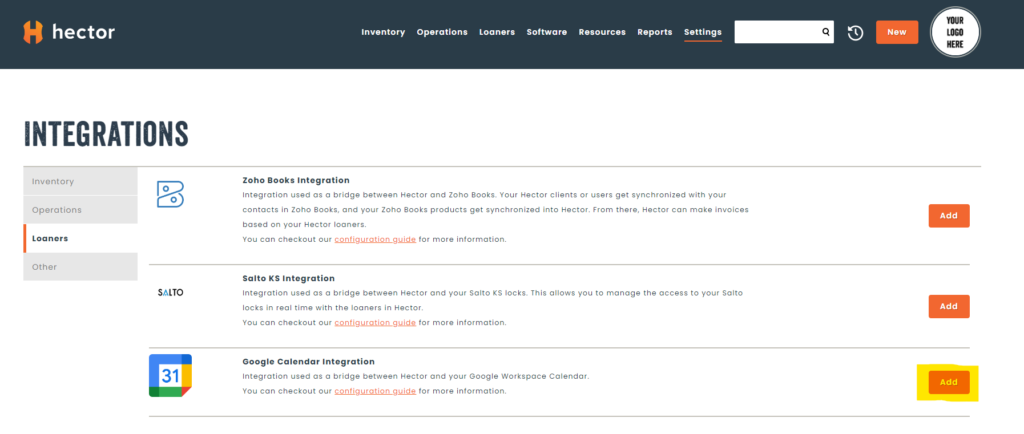
Connect to your Hector instance as an administrator and navigate to the “Settings” menu, and then click on “Integrations”. Once inside, choose the “Google Calendar Integration” in the “Loaners” tab and press “Add”.
Here is the list of the fields that you will have to fill:
- Admin Email: Email of an account with admin privileges on your Google Workspace.
- Default user: The user who will be used when creating an event from Google Calendar if the requester of a resource (room, location, etc.) does not have a Hector account.
- Customer ID: Retrieved in step 2.
- Calendar ID: Retrieved in step 4.
- Category: Initial category in which your resources of type asset are going to be imported
- Synchronize Hector Changes To Google / Google To Hector: These configurations allow you to choose which way the information flows. Only from Hector loaners to Google, vice versa or both
- Google Event Title Prefix: You can choose a prefix that will appear in the title of every reservation on your Google Calendar
- Show created events as busy: You can choose if you want the events to mark the users as busy on Google or not.
- Tags To Ignore: Resources containing at least one of these tags in their private descriptions (separated by a comma) will not be imported into Hector.
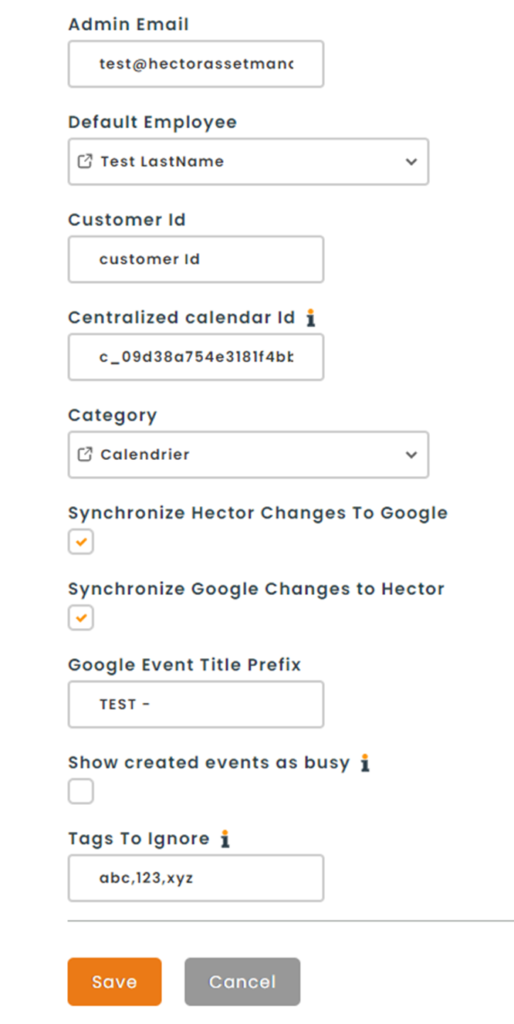
Press “Save and Integrate”.
Your Google Calendar integration is now set up and active. You should start seeing your resources soon and will be able to make reservation with them which will be synchronized to your Google Calendar.
If you configurations permit it, you will also be able to create Hector loans from Google. The prerequisites for a Google event to be synchronized are as follows:
- There must be a valid guest which will represent a requester in Hector
- There must be at least one resource associated with the event
- The resource(s) must be available in Hector in the given dates of the event
- The synchronization can take up to 5 minutes


This conclude our guide on the Google Calendar Integration. Happy loaning!