
Welcome to this online guide which will show you how to, in a few quick steps, configure your Entra/Intune with Hector. This will allow you to import and synchronize your organization’s devices daily from your AD and Intune Console.
1. Connect to your Microsoft Azure account.
You must have administrator privileges in order to add Hector as an authorized App.
2. Primary Domain
Once connected, click on the “Microsoft Entra ID” link and then copy your Primary Domain, located below, as you will need it later in the guide.


3. Client ID
You will then navigate to the App registrations section and create a new App registration for Hector. Once created, copy the “Application (client) ID” in the overview section and also keep it for later.

4. Permissions
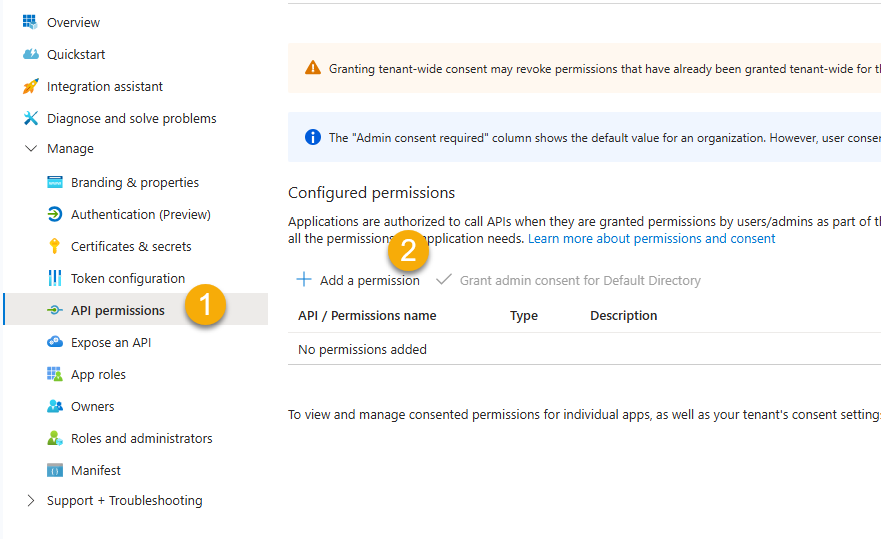
Click on the “Add a permission” button

Click on the “Microsoft Graph” section.

Click on the “Application permissions” section.

Device Synchronization
Scroll until you find the Device, DeviceManagementConfiguration and DeviceManagementManagedDevices sections and expand using the arrow.
Select the permission “Read.All” from those three sections and then click on the “Add permissions” button at the bottom.

Windows Defender Synchronization
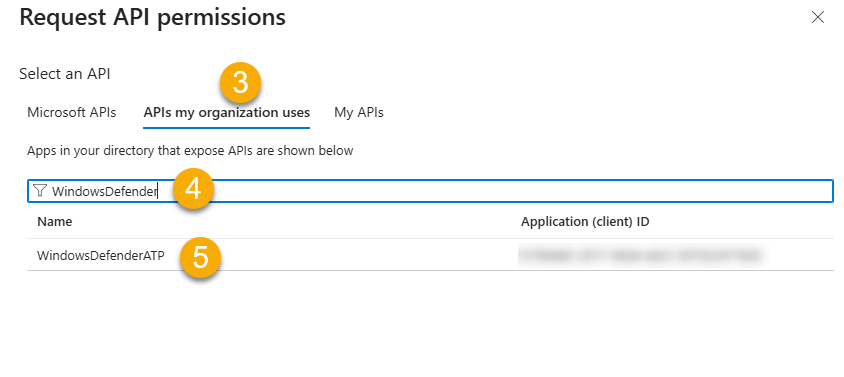
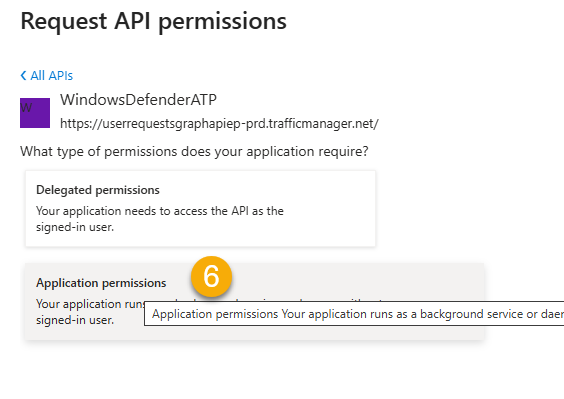
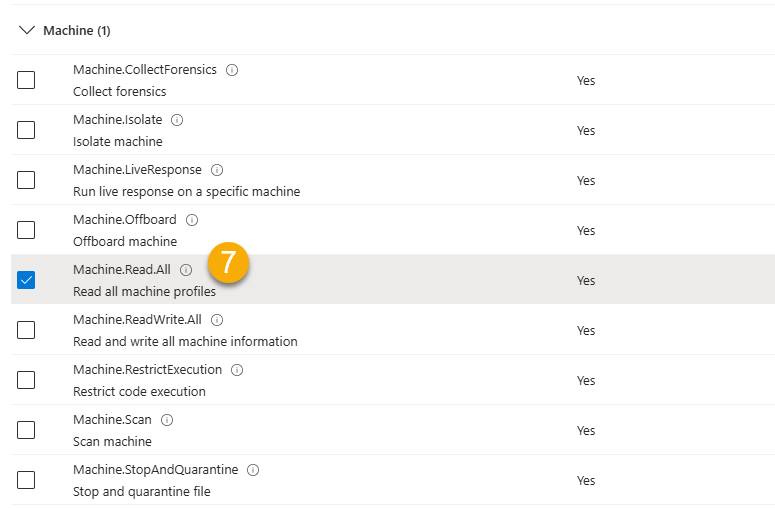
To pull information from Windows Defender for more accurate device reporting, add the following permissions. An active Microsoft 365 P1 or P2 subscription is required.

Security Group Synchronization
Add the following permission to synchronize Security Groups belonging to a device.

Software/Application Synchronization
Add the following permission to synchronize Applications belonging to a device.

Administrator Consent
Once the permissions have been added, it must be consented to.
- Validate that the newly added permission is indeed part of the permission list.
- Click on the “Grant admin consent for …………….” button

5. Secret Key
Click on the “Certificates & secrets” section

Next click on the “+ New client secret” button
- Enter “HectorApp” as a description
- Enter Never, or another expiration delay
- Click on the Add button

Copy the secret value and save for later

You have completed the Azure portion of the setup. Next step is to access your Hector instance as an administrator
6. Hector Setup
Connect to your Hector instance as an administrator and navigate to the “Settings” menu, and then click on “Integrations”. Once inside, choose the “Integration Azure Directory / In Tune” in the “Inventory” tab and press “Add”.

In order for the integration to work, you need to enter the primary domain, client ID and secret key retrieved earlier and choose a default category and initial destination.
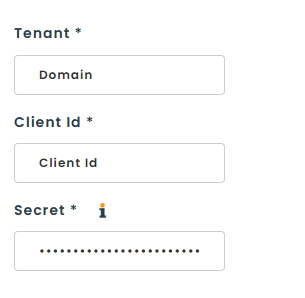
Once you’ve entered this information, click on the blue Validate. If everything worked correctly, you should be able to continue with the Intune configuration. If an error occurred, the details should let you know where to look.
7. Hector Configuration
Options
- Location
- Category: The category in which the devices are going to be initially created
- Initial Destination: The whereabout in which the devices are going to be initially created if the destination synchronization is not activated or it wasn’t found
- Automatically assign device to user: During synchronization, if a user is found, either through the UPN, or the last connected users, Hector can automatically assign the device to the user.
- Import
- Import Devices: True by default and cannot be turned off.
- Import Windows Defender: If you have a valid P1 or P2 subscription, you can use Windows Defender for more accurate field reporting for users, last connected dates and other device information.
- Import Device Groups: Devices can be assigned to Security Groups in Azure. Check this box if you want these security groups to be imported into Hector for filtering purposes.
- Import Applications: You can also sync the list of software found on each device. Refer to our Intune software guide for more information about the next steps.
- Duplicates
- Use Device Name For Duplicate Detection: Hector uses the serial number for duplicate detection. However, it can happen that a device’s serial number has been left blank. When this is the case, Hector could potentially create a duplicate. You can also use the device’s name to prevent this situation.
- Archiving
- Archive inactive devices: If set to true and if you deactivate a device in Azure/Intune, Hector will archive it during the next synchronization.
- Archive after: You can automatically archive devices that haven’t been synced to Hector after a certain amount of time. For example, you deleted the device in Azure/Intune, and want Hector to archive it after 7 days.
Filters
Filters can help you import only devices that fit your needs.
- Import Intune devices only: Devices must be in Intune to be imported into Hector.
- Import devices that were once in Intune but are now only in Azure: Intune has a policy that will erase devices after a certain period of inactivity. Checking this option allows these devices to remain in Hector if they are still in Azure.
- Import only the devices owned by your company: If Activated, Hector will only import the devices marked as owned by your company
- Import only the devices with join type hybridAzureADJoined: If activated, Hector will only import the devices with join type “hybridAzureADJoined”
- Do not import new devices: If activated, the integration will not import new devices, but instead only update the ones already existing. It will make a match with existing assets based on their asset tag or serial number with the attribute chosen below.
Advanced Filters
- Device name: You can filter devices based on their name.
- Security groups: You can filter devices if they belong to a specific security group. Multiple security groups can be entered with a ; between each.
- Intune Categories: You can specify categories from your Intune environment (the field “deviceCategoryDisplayName”) by separating them with a comma. If categories are added this way, Hector will only import the devices who are part of those categories.
- Maker: Only import devices with a specific manufacturer.
- Model: Only import devices with a specific model.

Fields
- Replace model (if exists): If you created your inventory before activating Intune, the model of the device can be replaced during synchronization using the one in the BIOS. If left unchecked, your existing values will be used.
- Created date: Hector can use the device created date in Azure for its acquired date in Hector. Although this is not the purchase order date, it can allow the acquired date to be closer to the truth that if not used.
- Use System Generated Asset Tags: Hector will generate a unique asset tag for every synchronized device. Leave unchecked if you plan on using your own asset tags.
- Attribute Selector: Select which attributes from the list you want Hector to create and update on the imported devices.
Don’t forget to save!
Your Intune integration is now set up and active. An automatic synchronization of all the devices in your organization will be performed every day.